How to make basil salt

Have you found yourself with a bumper crop of basil, and wondering what you can do with it besides pesto, drying, or freezing it? Basil salt is a wonderful way to preserve the harvest to use throughout the year!
If you don’t have basil don’t worry! You can order some from me, and have my garden bounty in your kitchen.
What you’ll need:
a food processor (I recommend this one because it has a built in side scaper)
fresh basil
a good quality salt like Redmond Real Salt
parchment paper and baking trays
oven
storage containers
First steps
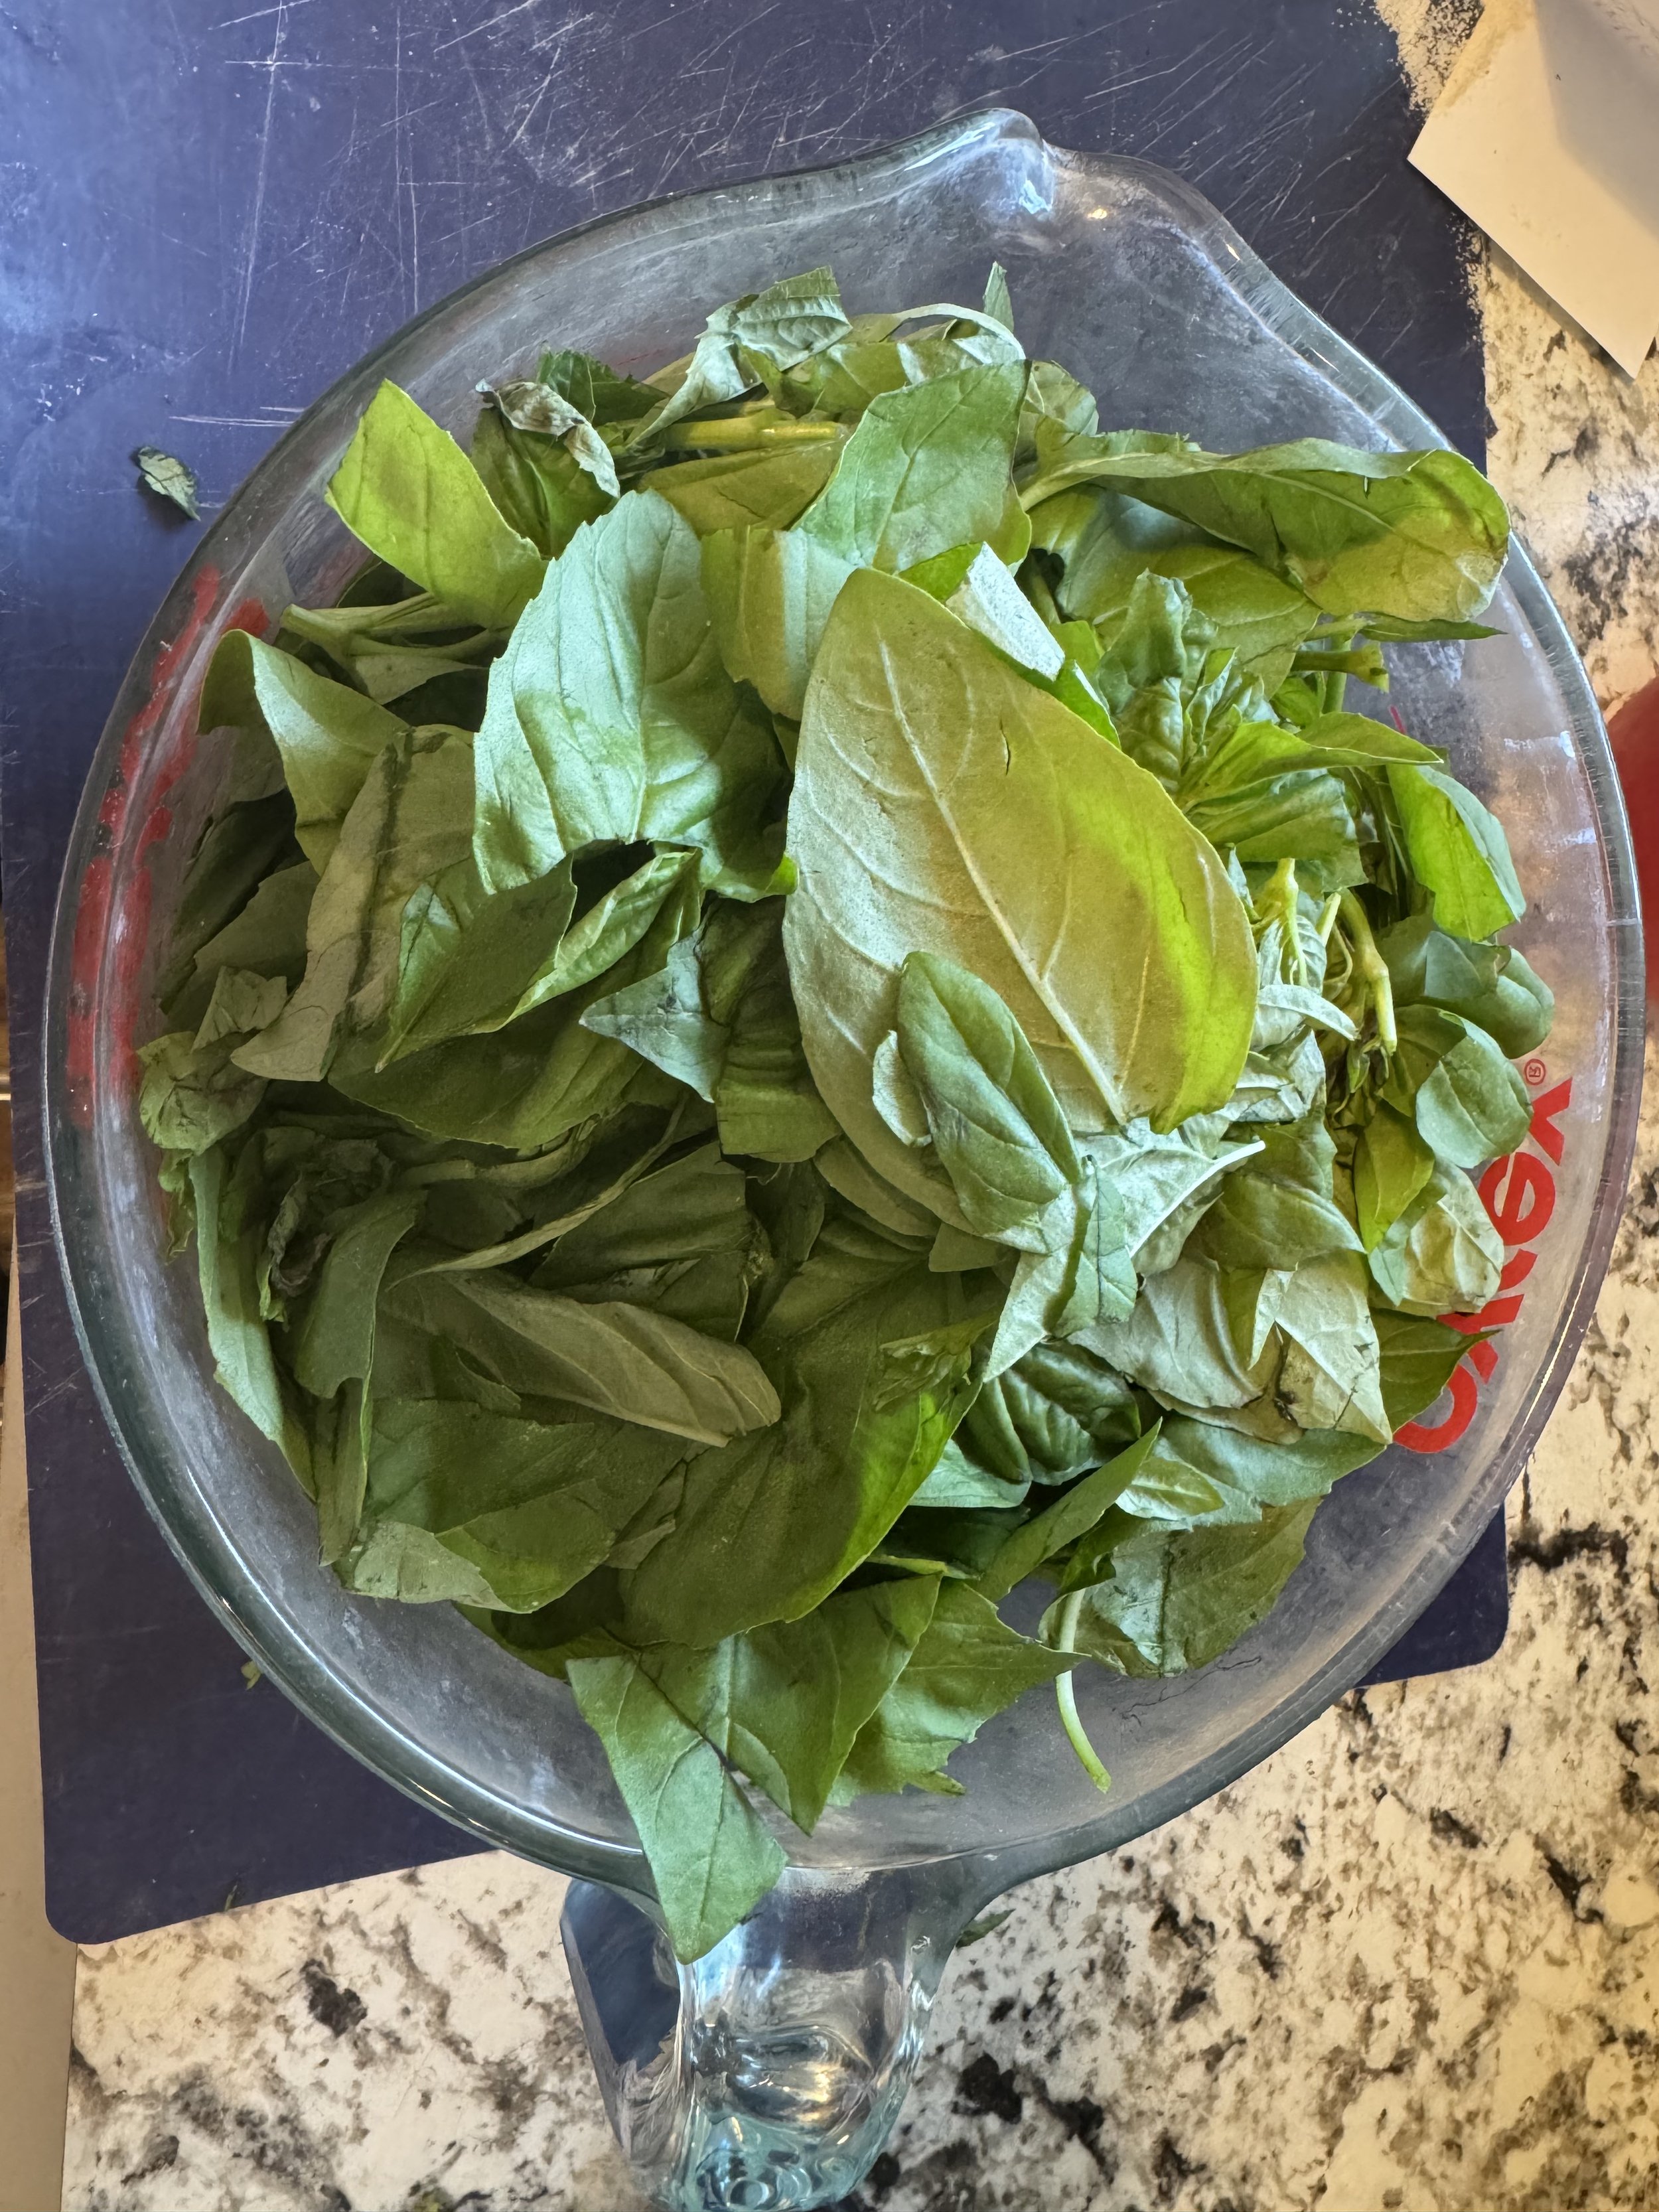
The first thing you’ll want to do is harvest your basil. If you’re new to harvesting basil, it’s best to pinch off the basil at the Y spot in the steM. This will help it branch out and grow more.
Once it’s harvested you’ll want to wash it well, and then dry it. Once there’s no water left on the basil it’s time to begin!
You’’ll want to measure how much fresh basil you have. You’ll want to pack the basil into the measuring cup tightly and use that as a measurement. (Feel free to keep the stems on your leaves because they have a lot of flavor, and this way nothing is wasted!)
There are a lot of different ratios out there for how to make basil salt. I love basil, so I wanted a higher ration for my salt than I’ve seen others use. I choose to do a 1:1 basil to salt ratio. This means in the end I use equal parts basll and salt. Feel free to taste and add more salt or basil to your taste.
Add your basil
Now it’s time to add it’s time to add the basil into your food processor. For many things you can use your blender for, but in this instance you really need a food processor. Trust me….I tried. I went out and bought my food processor specifically to make basil salt because my vitamix did not work!
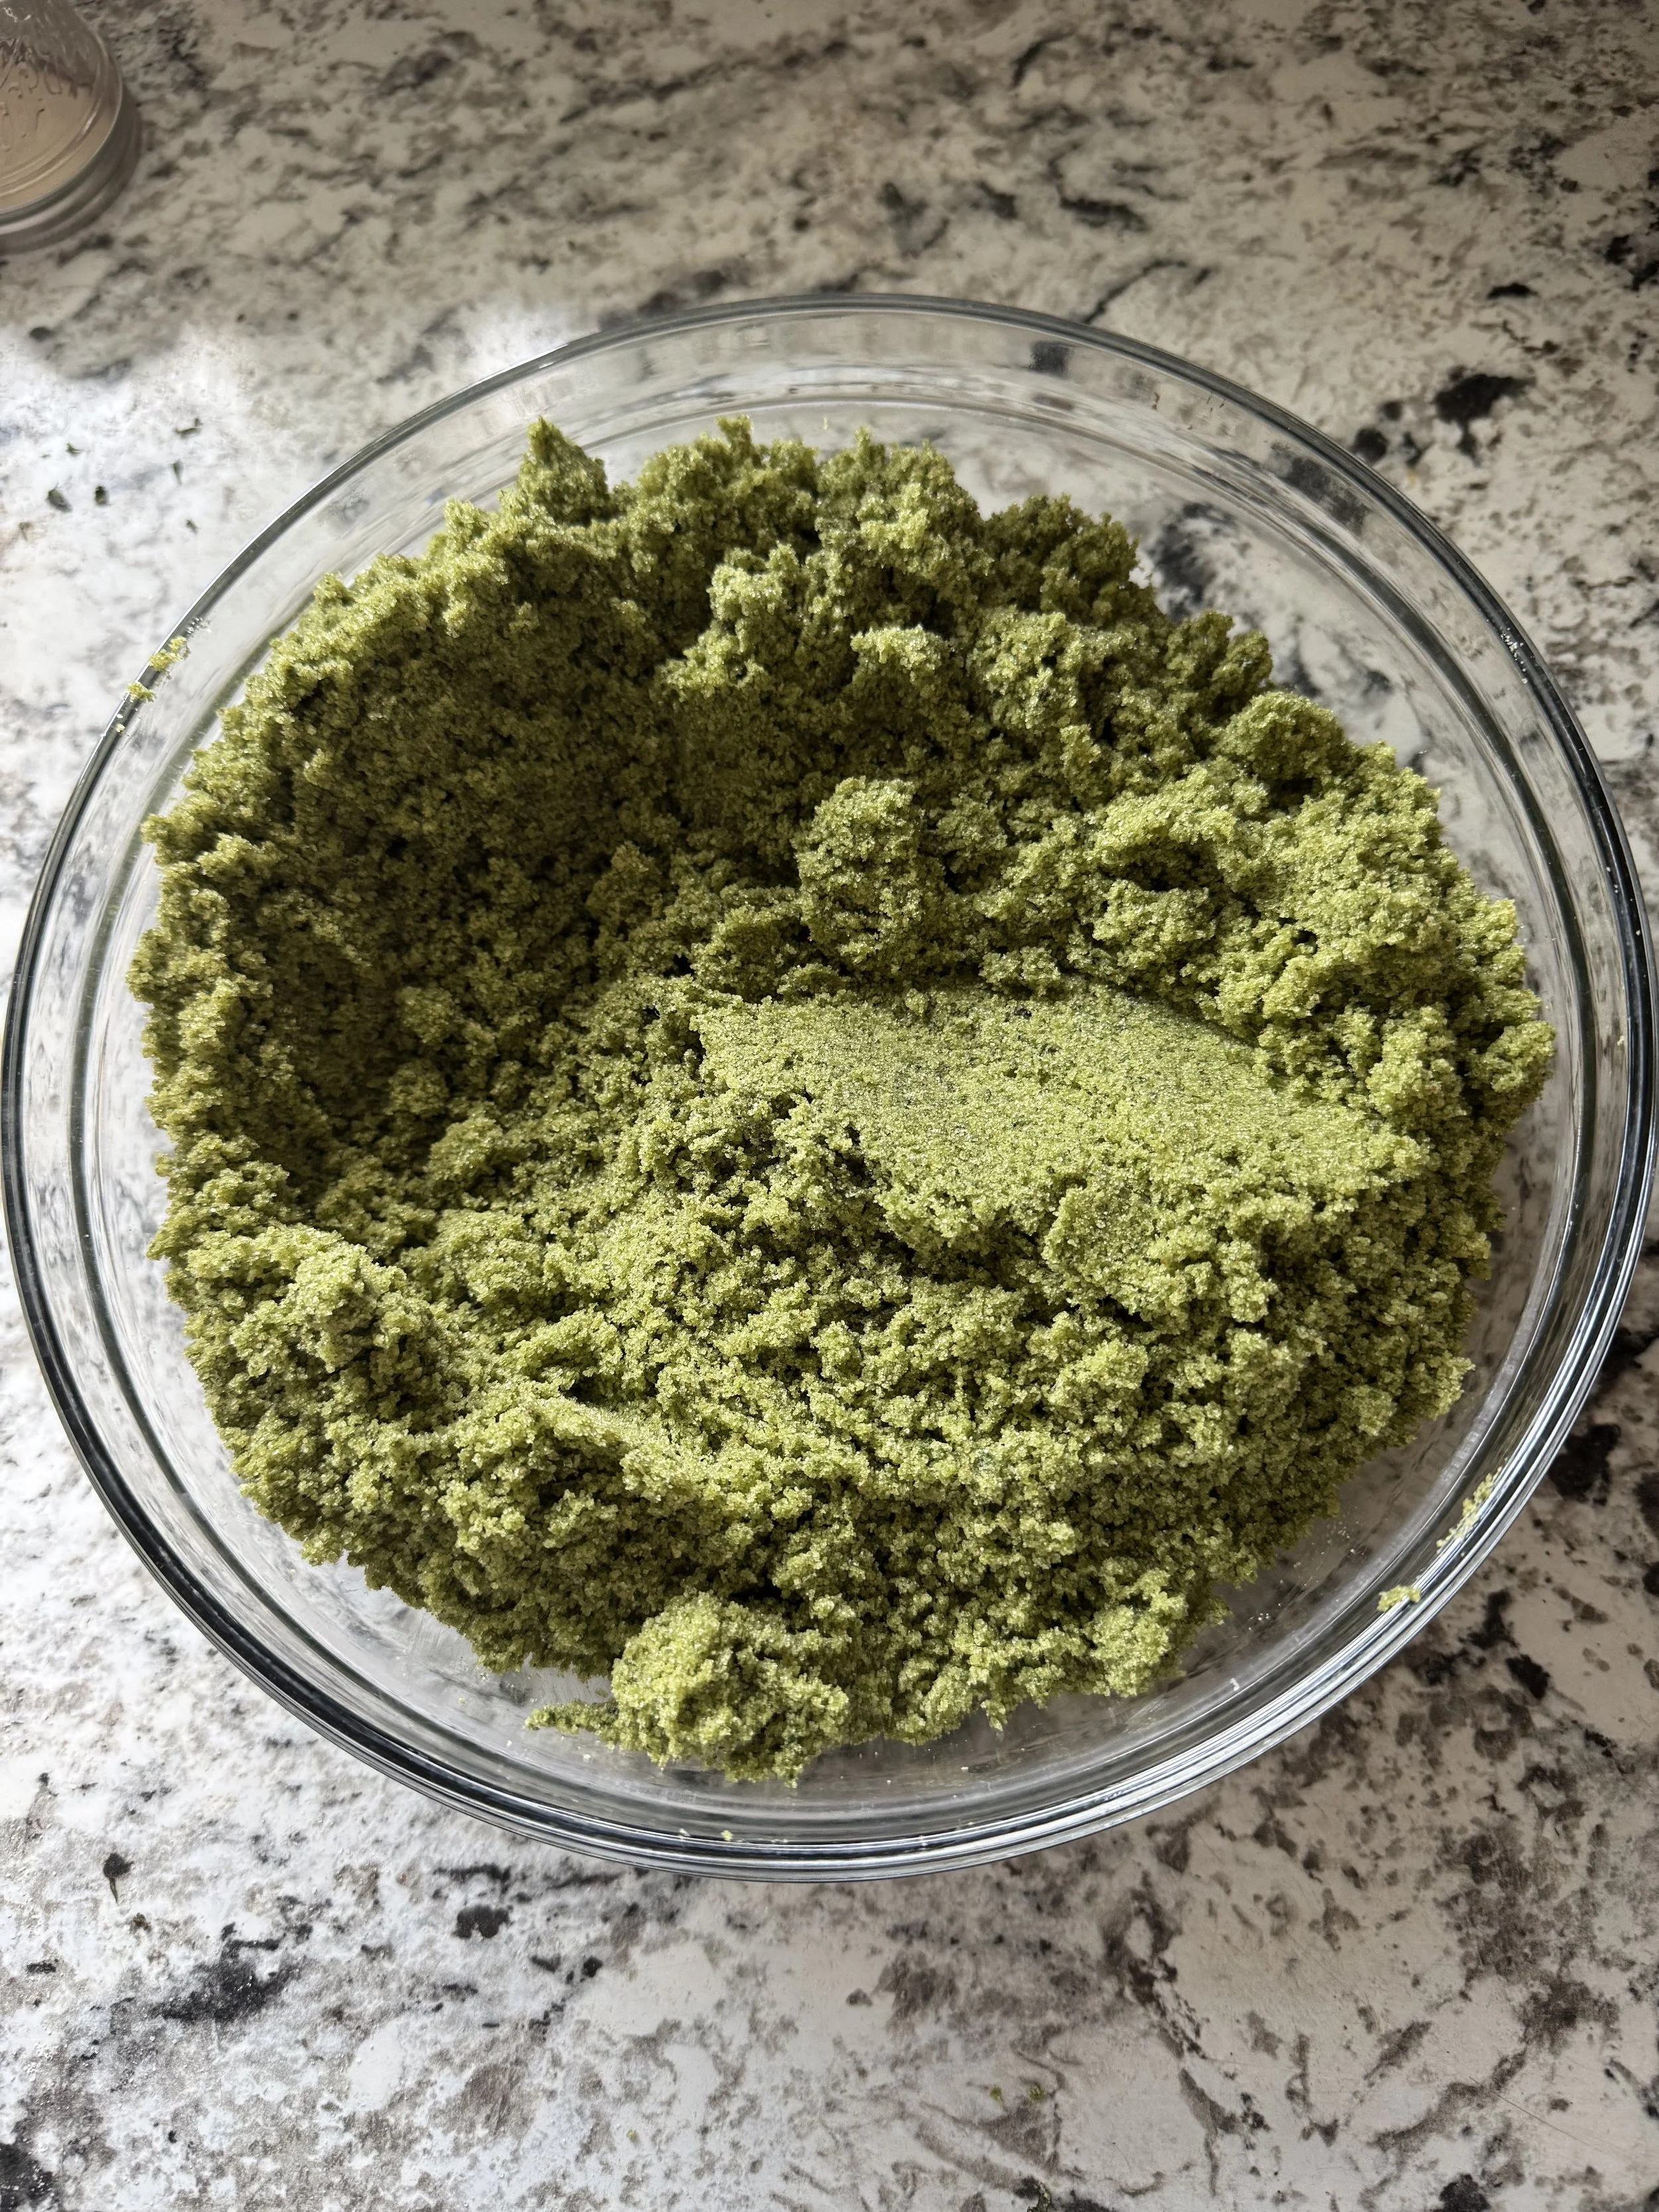
You will pulse the basil in the food processor until it has broken up evenly into little pieces.
Add salt
Once your basil leaves are evenly broken up it’s time to add your salt to the basil in the food processor. You will pulse the mixture together until it is all evenly mixed. There shouldn’t be any big chunks left, and should smell AMAZING!
Time to dry out the mixture
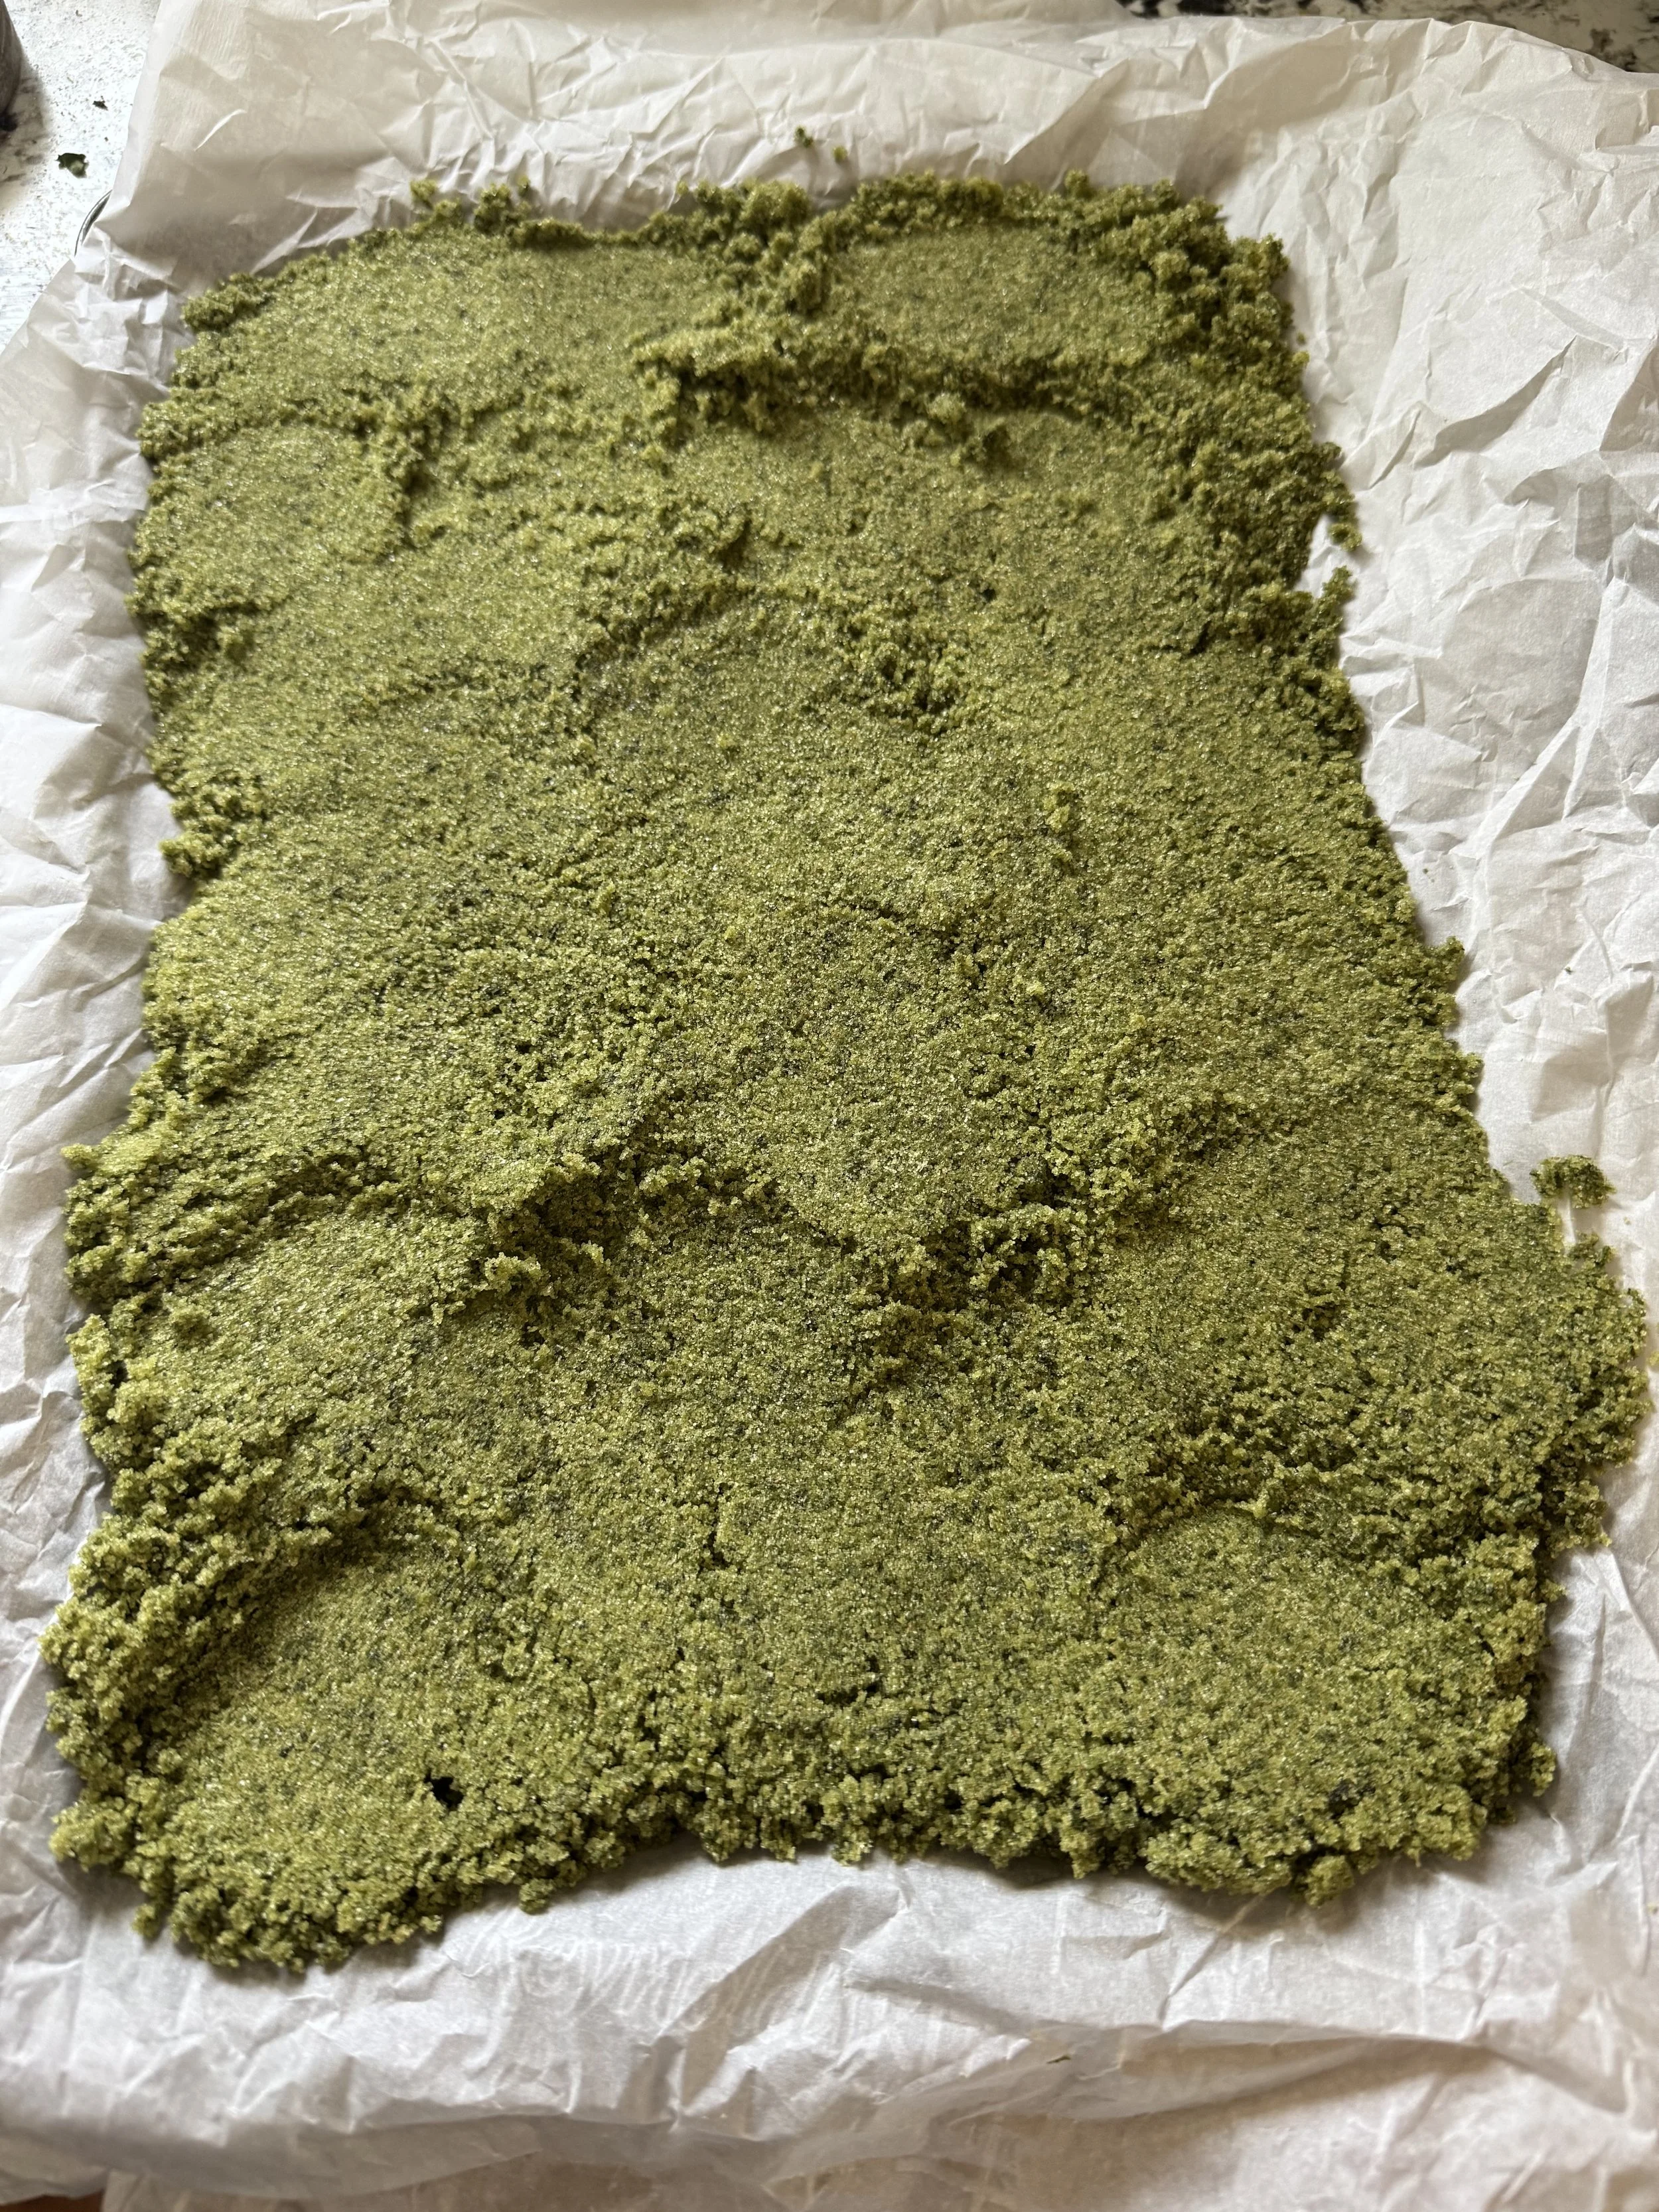
You will notice that the mixture is quite damp due to the liquid from the fresh basil, and will need to be dried out in order to be preserved. If you have a dehydrator you can definitely use it, but I prefer using my oven to dry out my seasonings.
You will want to line a baking tray with parchment paper, and then evenly spread the basil and salt mixture over it.
Tip: If your parchment paper likes to curl just crumple it into a ball. Then spread it back out onto your baking sheet and it will stay put!
You will place your baking try into your oven at the lowest heat setting it has (this varies between models). In about an hour you’ll want to go in and move the chucks around a bit, and then place it back into the oven to dry out a bit more. You should find that it’s completely dry and hard in a few hours in the oven.
At this point you’ll move the mixture back into the clean food processor. You’ll pulse the mixture to break it all up. Once it’s been broken down to about the size of salt granules you can transfer into whatever container you plan to store it in.
How to use basil salt
My favorite way to use basil salt is sprinkled over a fresh sliced tomato from the garden. However, it’s so versatile in the kitchen! You can use it in anything where you’d normally add basil.
It pairs well with any meat/fish, pastas, and roasted vegetables. I find that it helps complement vegetables like peppers, zucchini, and tomatoes because it helps enhance their sweetness. Which means it’s also an excellent addition to salads.
There are tons of ways to use it. Be sure to let me know what your favorite dish is to use basil salt in!
How to Make a Gluten Free Starter
My Sourdough Journey
Have you ever heard that sourdough bread is the gateway into homesteading? Well, I’m here to tell you that it’s the truth! I’ve been gluten free for 25 years, but I didn’t care about where my food came from until about 2011 when my son was born.
Once he came into the world I was very aware of the additives in most gluten free products. I really hated everything that was added in gluten free bread products. There was so much starch added into most bread that I didn’t feel good about my family eating it regularly. This started my journey into trying to make a gluten free sourdough starter.
This was before the big sourdough push, and I hadn’t heard of anyone doing this. I didn’t let it deter me and did had A LOT of trial and error. Mostly error in the beginning, but at least I learned quickly what NOT to do!
At the time I had a 1:1 baking mix that my husband and I created (at the time 1:1 blends weren’t readily available at an affordable price). This showed great promise, but around the two week mark it tended to mold. I tried multiple times with 1:1 flour through the years, and still ended up with the same result. For this reason I DO NOT recommend using 1:1 baking flour. Yes, I know these companies say you can do it….but it won’t yield great results. Plus it’s more expensive!
I tried buckwheat flour next, but it turned pink! It wasn’t mold it was just a chemical reaction that happens. It just weirded me out, so I didn’t like this starter much.
Next I tried brown rice flour, and this was the sweet spot for me! Not only is it cheap, but it yields the most consistent results. As you go down this journey and experiment with flours you may find that some flours are super reactive and rise too quickly, and others are too slow. Brown rice flour was just perfect for me.
Here’s a money saving tip: Brown rice is cheap. Brown rice flour is often quite a bit more expensive. If you have a nice strong blender you can make your own brown rice flour in it! I milled my own flour for about two years using my blender before I upgraded to a grain mill. I wasn’t going to invest in a mill unless this was something I could do regularly.
Starting your gluten free sourdough starter
Starting a gluten free starter may take several attempts. You may find mold at different points, but don’t give up! If you aren’t up for trying you can always snag some of my well established starter in my farm store
This simple recipe generally takes about 5-7 days to complete, but it could take longer. (You can speed up the process if your house is on the cooler side by using a heat mat under your starter. Ideally you’ll keep your starter between 70-80 degrees F) The key to creating a successful starter is patience. Don’t rush the process, and enjoy the little things. Look for the aroma changing to a slightly sour smell and the baby bubbles that emerge.
Day 1: In a pint jar add 25 grams of brown rice flour and 25 grams unchlorinated water. (If you have city water that adds chlorine you can let it sit on your counter overnight to let it dissipate) Mix this up well and let sit covered overnight. (You can use a the lid for the jar, but don’t screw it tight. You can also use a paper towel secured by a rubber band) Mark the level of the mixture with a rubber band, so you can see if the mixture rose.
Day 2: To the 50 gram mixture you will add 50 grams brown rice flour and 50 grams of unchlorinated water. Mix it well. (This is called 1:1:1 feeding: equal parts starter/flour/water) Move your rubber band to the new level on the jar.
At about day three or four, your starter will begin to have an unpleasant odor. (Think stinky socks) Keep going… it will change for the better!
Day 3 Now you start the discard process before your feeding in order to keep your starter happy, but avoiding it getting huge. Once your starter is mature you can keep it in the fridge instead of discarding. For now you’ll want to discard back down to 50 grams. You’ll end up discarding 100 grams of starter (don’t save this to bake because the bacteria isn’t right yet), then feed 50 grams of water, and 50 grams of starter.
Move your rubber band back to the top of your starter line. Now is around when you’ll start to see activity. You may see it looking like cracked earth, or it may have a domed top as it tries to begin rising.
Day 4-14 Repeat the process of day 3 but now feed/discard every 12 hours.
A gluten free starter doesn’t necessarily double in size, but if it gets close to doubling you should be ready to start baking.Note: Time mentioned here is a guide rather than a determining factor for when the starter is ready. Use your senses to determine when it’s ready. Once your starter is puffy, has a sweet-sour aroma and bubbles are present under the surface, your initial starter is ripe or ready.
When you’re ready to try baking bread I have a great EASY recipe available for you in the shop.
Tips and Tricks for Your Starter
As with everything in life, sourdough will throw you unexpected curveballs. Here are some of the common questions I have been asked for help with.
What do I do when my starter begins to act sluggish?
This is an easy fix, and happens to everyone at some point. If your starter isn’t producing the result you’re looking for, or it isn’t rising you just need to add a simple ingredient to a feeding. You can add a splash of apple cider vinegar or honey into your starter. This just gives it a bit of a sugar boost to make it active again. Personally I prefer adding ACV because it keeps the starter vegan for when I bake for vegan friends.
Why do I have a layer of liquid on top of my starter?
This liquid is referred to as hooch. When you see hooch it generally means your starter is hungry. Hooch is sour, and you have two options on how to deal with it. One would be to mix back into your starter if you like it to be a bit more sour. The other option is just dumping the hooch out of your jar.
I messed up my starter and there’s mold on it. Do I really have to start over?
Unfortunately, the answer is yes….but there is a way to avoid this happening again! Once your starter is established take a bit of the discard and freeze it. Then it’s there when you inevitably mess up (we all do it). As your starter gets older and stronger, replace that frozen bit with a bit of discard from the stronger starter. Then as time goes by keep doing this, and you’ll always have a fail safe.
Meet the Meishan Pig
If you follow us on social media you may already know that in the past year we took a big jump for our little homestead by becoming the first registered breeder in the state of Ohio. Initially we purchased a breeding pair from Imperial Farms located in Georgia.

This is Toby.

This is Lucy.
They were 6 weeks old when we brought them home, so we knew we wouldn’t be able to breed them until the Spring. We made plans to buy purebred meishans from another farm for the kids to show at fair. Then a wonderful opportunity fell into our laps! We found a registered bred sow (female pig that’s had a litter) and a boar for just a little bit more than we would have spent on fair piglets, so we couldn’t resist!
The pigs were located in Arkansas, and we were lucky enough to have someone headed our way. We were able to meet up with them in Louisville, Kentucky. We met up in a Walmart parking lot and did a pig transfer. At that point we took ownership of Jojo and Daisy Mae.

I don’t know what I expected when it came to a pregnant sow, but Daisy was so much bigger than I expected!
Daisy was due on November 17, 2024. She started nesting behaviors a few days before, so I expected her to give birth a few days early. The night of the 16th she began FURIOUSLY nesting. I’m talking n0n-stop making and remaking her nest. I stayed up all night with her because it was a cold night, and I wanted to make sure the piglets were warm if they came. I gave up at 6 a.m. and went to bed.
Then I got up around 10 a.m. and checked in on her. She was just starting her contractions. She gave birth to 18 piglets, and has proven to be a stellar momma!

Now we have lots of little piglets running around keeping us busy! They are so adorable and curious. They remind us of little elephants.
We have some that will be going to other homes when they are old enough, and others we will be raising to sell as full/half hogs to feed other families.
If you are interested in purchasing either registered gilts/boars, or a barrow feel free to send me a message for more information.
You should heat your kombucha, and here's why

It's that time of year again. The weather is starting to chill, and the leaves are falling. Most welcome the change of seasons as it usually signals a slower way of living for the next few months. If you're anything like me, the colder months also bring a whole new set of challenges. Especially if you like fermenting things like kombucha!
For years I could successfully ferment kombucha through the Spring and Summer months. As soon as late Fall would hit the kombucha would mold EVERY TIME. It didn't matter the tea blend, or how new the scoby was...it would mold.
Eventually I decided that I just couldn't make kombucha in the Winter months. My routine would slow down in the Fall and then stop during Winter. Usually around the end of March I'd pick it up again. I accepted that this is just how things were, and that there weren't any other options.
I kept this up routine up for YEARS until I realized there was another way! Ferments will mold if they are too cold, so the answer was so simple....I needed to HEAT my kombucha!
What temperatures do you need for kombucha?
Ferments all work about the same, but they each have their own temperature preferences. Kombucha specifically is happy when it's temperature is between 60-85 degrees Fahrenheit. Even though this is quite the range, I've had the best luck when the brew is between 72-80 degrees Fahrenheit.
You will find that the warmer the kombucha is the more quickly it ferments and vice versa. It kombucha gets too cold it slows the fermenting, and this is usually when you begin to have mold development. This can be a tricky balance during the colder months because our homes are naturally cooler.
So how can you keep your kombucha warm enough?
You'll want to know exactly what temperature your brew is. I've found the easiest way to keep an eye on this is to have a special thermometer. It just sticks to the outside of your brewing vessel.
You can buy a fermenting heat mat. This will ensure that your brew stays warm. (This solution can also be used as a seed starting mat, so bonus use!)
My favorite method to keep my kombucha warm is a simple strand of Christmas lights! It just keeps it slightly warmer than the ambient temperature, but it's just enough that I don't have to worry about it molding. I have found that I really enjoy the ambient glow from the lights in the evening too.
If you are new to brewing kombucha be sure to read this post about how to brew kombucha at home.
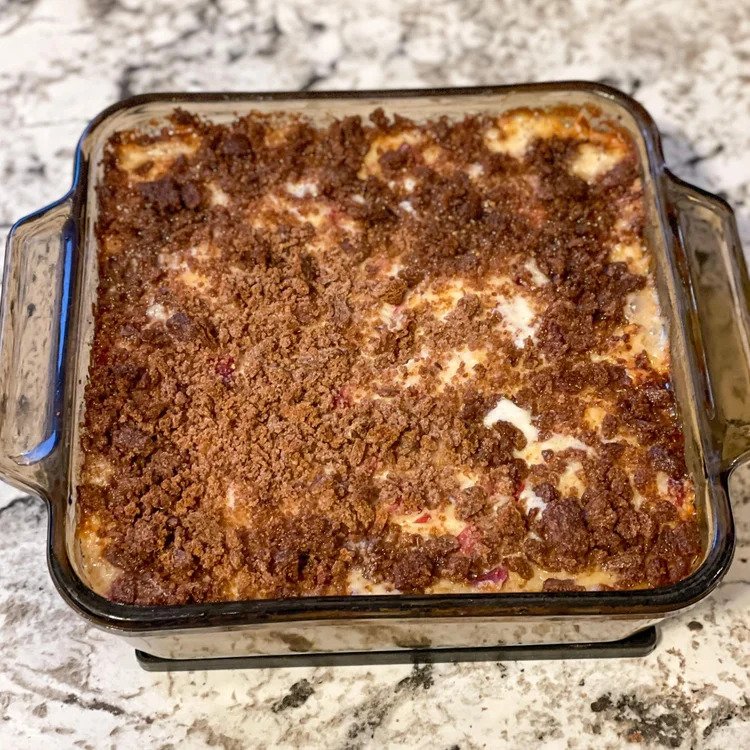
Easy Four Ingredient Corned Beef Casserole

Corned beef casserole has become one of my family's favorite dishes. It can be made with left over corned beef brisket, or regular corned beef lunch meat. It can be made simple, or you can add extras into the casserole.
It's super easy to make, and it only takes 5-10 minutes to prepare. It's simple enough that it's a fantastic recipe for beginner cooks/kids to make.
Here's what you'll need:

1/2 lb to a lb of corned beef-this can be left over corned beef brisket or lunch meat. Add as much or as little meat as you want in your casserole.
1 lb swiss cheese-grated
1 cup cheddar cheese-grated
1 jar of sauerkraut-drained well
1/2 cup to 1 cup of Mayonnaise
Bread crumbs (optional)-I used bread crumbs from my gluten free sourdough. If you aren't gluten free you can make bread crumbs from rye bread for a more traditional rueban taste. You'll need enough to cover your baking dish.
Caraway seeds (optional)-Sometimes I add these, but most of the time I don't. The caraway seeds give it a more rye flavor. (Since we're a gluten free family we can't eat Rye)
Here's what you'll do:
Step 1: Preheat the oven to 350 degrees F.
Step 2: Place the corned beef, swiss cheese, cheddar cheese, sauerkraut, and caraway seeds (if using)into a medium sized mixing bowl. Add mayonnaise. Start with a 1/2 cup and then keep adding until the mixture sticks together .
Step 3: Press the mixture into a casserole dish. Top bread crumbs (if using

Step 4: Bake the casserole for 30, or until it is bubbling. Let it cool and serve.
Doesn't that sound super delicious and super easy?!?! If you try this recipe come back and let me know what you thought!
What is a continuous brew kombucha, and how to make a concentrate for it?

How do I know if a continuous brewing kombucha system is right for me?
Do you find yourself brewing multiple gallons of single brew kombucha at a time to stay on top of your kombucha drinking?
Are you needing the most simple, least complicated way to do things?
Are you looking for quick and easy?
If you answered yes to any of these than a continuous brewing kombucha system is right for you! If you didn't say yes to any of the questions that doesn't mean it isn't right for you, but you may want to check out my previous post about small batch brewing.
I've already written a post that explains everything you need to begin a continuous brew. If you haven't looked at it yet, be sure to check it out so you can begin.
What is a continuous brew kombucha?
Simply put, it's a large vessel full of kombucha that you are filling as needed. It ferments more quickly, so you can generally always drink it instead of waiting a week. It also has more yeast in it which makes it great for doing a second fermentation (F2) because it helps add extra fizz. If you are bottling it for a F2 you will want to stir the kombucha to get the yeast off the bottom and more evenly distributed throughout.
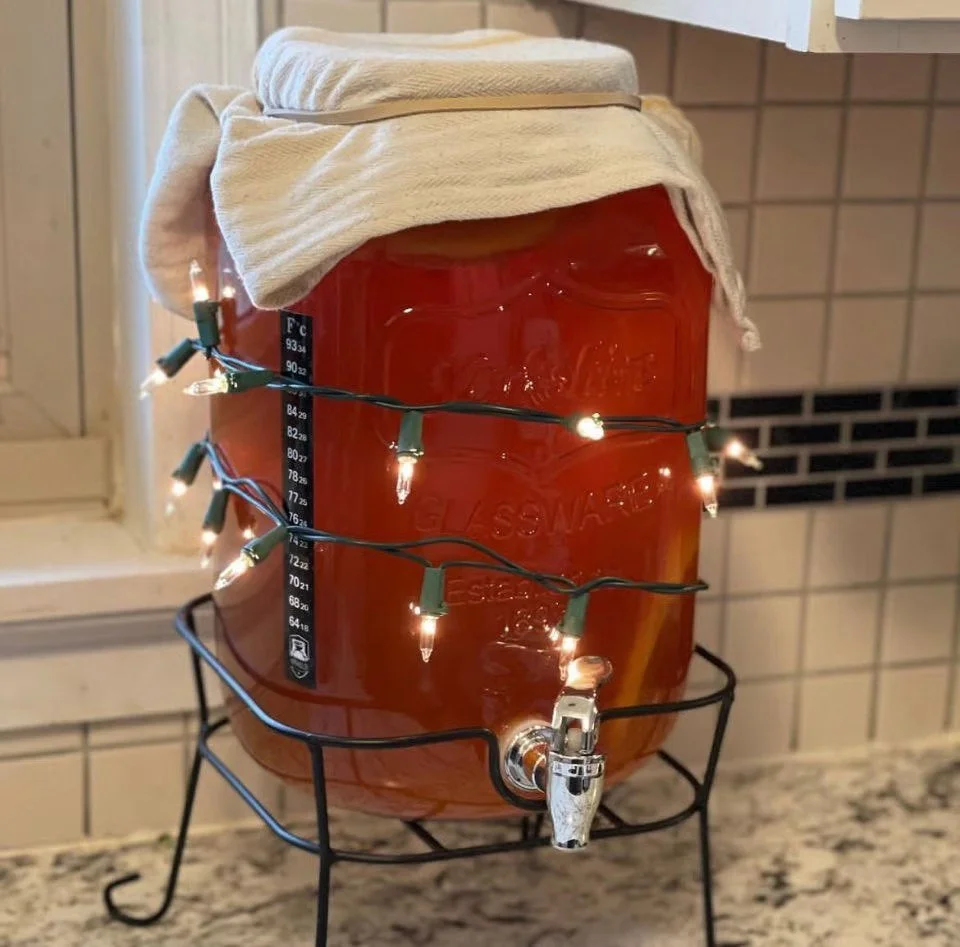
For a continuous brew vessel it should be between 2-5 gallons. Many will have a spigot on it for ease of dispensing. (I have this one because I wanted it on a stand to make it easier to dispense)

Many people will wait until it gets about half empty, and then they will make a batch of sweet tea (just like the single brew method) then add it to the vessel. I need things as easy as possible, so I decided to make a concentrate to easily fill it as needed.
Before you start doing a continuous brew you need to have a batch of kombucha you've already brewed ready. (If you don't know how to do this refer back to this blog post) Preferably enough to fill half of your vessel. Then you can fill it with the kombucha concentrate, but wait until the scoby has grown over the entire top of the vessel before drinking.
How to make a kombucha concentrate?
I like to make one big batch that will last me at least a month. We keep it in a gallon container in the fridge. You can use any gallon container, but I would stay away from gallon pickle jars. If you want to buy a jar this is the one we use.
Ingredients
12 cups of water
3/4 cup black tea leaves (this is my favorite tea for kombucha)
6 cups sugar (I like to use organic cane sugar)
Instructions
Step 1: Bring all 12 cups of water to a boil and then remove from heat.
Step 2: Add the tea leaves and let it steep for 20 minutes
Step 3: While the tea is steeping add all the sugar into your gallon jar. I know it looks like a ton of sugar,but try to remember that we're making a concentrate. So you will only use a small amount of this each time.

Step 4: When the tea is done steeping you will want to strain it into the gallon jar. I find the easiest way to do this is with a reusable coffee filter. It works much better than a paper coffee filter in a funnel.

Step 5: Stir the jar until all the sugar has dissolved. This goes quickly if the tea is still warm.
Step 6: Store the jar in the fridge until it's time to refill your brewing vessel.
How do I use my kombucha concentrate?
It's up to you how to you choose to refill your brewing vessel. You may choose to refill it a quart at a time, or you may wait until it's almost half full. Either way works! When you want to refill the kombucha here's what you need to do:
Step 1: add 3/4 cup concentrate to a quart jar

Step 2: Fill the rest of the quart jar with warm water (this prevents the scoby from getting to cold). Add it to your brewing vessel. Do this as many times as you need until your vessel is full.

If you don't have a quart jar than you would add 3/4 cup of concentrate to your vessel, and then 3 1/4 cup warm water to the vessel.
What maintenance does continuous brewed kombucha require?
Periodically your spigot may get clogged with some yeasty bits (looks like boogers). You will want to clear that out. Usually all I need to do is pull it out.
Once a month I usually need to go in and maintain my scobys. This is because the scobys are getting to big/to strong and it's fermenting too fast. I know it's time to do this when I can see bubbles in the brew, or there's bubbles in my kombucha without a F2 fermentation.
When I need to do this I wait for the vessel to be half full. I'll pour the contents into a clean pot/jar. Then I will remove the spigot so I can clean that really well. Then I'll replace the spigot. Next I will split my scobys. I'll put the scobys I don't want to use into my scoby hotel (talked about at the bottom of this post) and then I'll add the scoby I'm going to use back into the brewing vessel.
I like to strain the brewed kombucha through a fine mesh strainer when I add it back into the brewing vessel. This helps get the big yeasty bits out, so hopefully the spigot doesn't clog.
Then you just need to fill it with concentrate and keep on going!
How to make incredible single brew kombucha at home

Brewing kombucha at home is surprisingly easy, and it's much cheaper than buying bottles from the store! It also has some great health benefits because it's full of beneficial probiotics. Be forewarned though, it becomes addicting! You may quickly find you are brewing gallons of Kombucha at a time. If this happens to you, changing to a continuous brewing method may be for you. This post will give you everything you need to know about how to do a continuous brewing method.
What tools do you need to brew Kombucha at home?
A scoby. This could be a live culture, a dehydrated culture, or you can even make your own. I have had the most success with a live culture.
Your brewing vessel of choice. I would suggest a gallon jar (I like these)having at least two, so you always have one clean for the next batch to go into.
A good quality black tea. I adore the Three Sisters blend from Farmhouse Teas. I find that the blend of teas gives a superior taste to my kombucha brews. You can also use some herbal teas. Raspberry leaf was one that I used to use. I liked it, but had issue with mold growth which is when I switched to a black tea.
A tea strainer or coffee filter
A tightly woven cloth. This could be coffee filters, paper towels, napkins, or cheese cloth. This will help keep any potential bugs out.
An elastic large enough to go around the top of your brewing vessel
Sugar (some will say you shouldn't use cane sugar, but I use organic cane sugar to feed mine without any problems)
A way to boil water and a large pot.
How should you prepare to make your kombucha brew?
You will want to make sure everything you use is clean. If it's not clean there is a risk of it molding and then you have to start over.
I tend to clean my jars in the dishwasher, but then I also clean them with a little bit of vinegar. (I've been told that a bit of soap residue is enough to kill your scoby.)
You'll also want to make sure that your workspace is clean before you start. That way in case you accidentally drop something you'll still have a high probability of having a successful brew.
Time to make your first kombucha!
In a medium pot, bring 14 cups of water to a boil. Remove from heat.
Add 3 tbsp, or 6-8 tea bags, and allow to steep for 10 minutes. While the tea is still warm remove the loose leaf tea/tea bags. Then add 1 cup of sugar and stir until it is fully dissolved.
Pour the sweet tea mixture into your brewing vessel and allow to room temperature. (If you add the scoby when it's too hot you can kill it.)
Once the sweet tea has cooled to 68-85 degrees, add entire starter liquid and the scoby culture.
Cover container with your cloth and secure it with a rubber band. Set your brew aside out of direct sunlight where it will stay at room temperature.
After 5-7 days you can taste the brew with a clean spoon. If it's too sweet, let it ferment a little longer. Sometimes this can take up to two weeks. Keep tasting it every few days until you know how you like it. The longer you let your kombucha ferment the more acidic and less sweet it will become. When it tastes to your liking it's time to start your next batch and dispense it.
Your kombucha is done brewing, now what?

The first thing I do is start preparing my next batch so that I've always got something brewing. So you will repeat the process as before. However, this time when your sweet tea is at room temperature you will take a cup of kombucha from your previous brew and add it to the new brew. Then you can bottle up the kombucha that is finished brewing and enjoy!
I generally put it in mason jars and keep it in my fridge until I am ready to drink it. This works well for me because I really enjoy the taste. If you want to have a flavored kombucha you will need to do a second fermentation.
What is a second fermentation?
A second fermentation (also referred to as F2) is just bottling up your kombucha to brew a second time. When I do my second fermentation I usually do them in quart mason jars with whatever fruit I have on hand. This works well for flavoring the brew, but it won't give you that fizzy effect you may be seeking.
If you are wanting to make a fizzy kombucha you will need to get some fermenting bottles. You will want to add your fruit mixture with a bit of sugar to the bottle and then fill it with your freshly brewed kombucha. Let it stay in the bottle until it has enough bubbles for your taste. Just be sure you burp the bottles daily, so you don't have an accidental explosion.
If you want to take the guess work out of it, I HIGHLY recommend these flavor packets. Using them has given me the fizziest kombucha I've ever made! If you're a fan of Dr. Pepper than the Cherry Almond is a must try! I'm also partial to the Strawberry Mojito and the Tumeric Ginger Peach.
Why has my scoby grown so much?
You will notice as you brew kombucha, with each batch you will have a new scoby grow. This causes it to become a thick mass within your brew. The bigger it gets the quicker it ferments your kombucha. It may seem like that would be a great idea, but it can be hard to manage when you need to move it to a new vessel.
So what do you do? You need to split it. It's easier to split the younger they are. As they get older you may need a knife to separate them.

When you look at the scoby, the bottom layer is the mother. She is the oldest. On top are all her babies. I will usually use a scoby for about two months, and then I will start using a new scoby. The older scobys I will give to my chickens, but if you don't have chickens you can add them to your compost too! The newer scobys I will give to friends or use to make scoby hotels.
What is a scoby hotel, and why do I need one?
When you're brewing kombucha at some point something will go wrong, and when it does you will want to have an extra scoby and liquid to start with. (trust me, I learned the hard way)
As your scobys grow, you will want to add them into jars with some sweet tea to create your scoby hotel. This ensures that if your kombucha brew ever becomes contaminated you have something immediately you can use to start over.
You should maintain your scoby hotels every few months. To do this all you need to do is replace the liquid in the jars with more sweet tea. Keep them in a place where they can stay at room temperature and out of sunlight.
I wouldn't recommend putting it on a shelf in your child's closet though. My daughter was CONVINCED it was an alien growing in her closet when she was about two years old.

Everything You Need to Get Started with a Continuous Brewing Kombucha System
My family started brewing kombucha at home about five years ago. We had decided that we wanted something to give us a boost to our gut health. It's packed full of probiotics to help increase the good bacterial in your gut. This in turn helps with digestion, and will improve your gut health.

Initially we I brewed it it small batches. Usually I brewed it in gallon jars, sometimes in half gallon jars. It just depends on how much I thought I would be drinking. Mainly it was just me drinking it, so it wasn't a big deal do do small batches. As the kids grew older, and my husband decided he wanted to start drinking it too, it became more of burden to do gallon sized batches. As the kids grew I realized I had been brewing 3-4 gallons brewing a week and it still wasn't enough!
After a lot of research I decided that I wanted to try continuous brewing of my kombucha. Continuous brewing kombucha is very similar to small bath brewing. It's the same process of adding sweet tea to your scoby (symbiotic culture of bacteria and yeast), but you add sweet tea whenever the vessel gets about half full. It ferments quicker due to more yeast being in the vessel, so you generally can drink it almost every day.
First I needed to order a few items, so that I could be successful.
The first think I wanted to order was a 2 gallon beverage dispenser with a stand. (the stand was very important to us because I wanted my kids to be able to easily serve themselves) I also purchased a stainless steel replacement spigot.
I decided I wanted an idea of the temperature of my brew (if it's too warm or cold it will die), so I settled on these temperature strips. My kitchen gets on the cold side in the Winter, so I decided to buy a small strand of Christmas lights to help keep it at temperature. Instead of the lights you may also consider a fermenting mat if your house also gets on the cool side.
In hindsight, I wish I had purchased a larger one because we go through it faster than expected. You can do continuous brewing in vessels that are 2-5 gallons. As a family of 4 I thought we would be fine with a two gallon vessel. I probably should have purchased a three gallon vessel. So when deciding on what size to buy consider your family size, and how much you expect them to consume.
In my this post I write out my recipe for the concentrate I use to easily refill my brewing vessel.
Starting Fro-dough, My Gluten Free Sourdough Starter

I was diagnosed with Celiac Disease over twenty years ago. At the time there wasn't much on the market to assist me with my new diet change. This forced me to rely on my own recipes and flour blends to create the tastes that liked.
The one thing that I was never happy with was gluten free bread. I just didn't like it. It was too dry, or too gummy. I was told by so many people that there wasn't a good gluten free bread out there, and a gluten free sourdough bread....impossible!
I wasn't willing to accept this.
Sourdough bread was my favorite before my diagnosis, so that's where I wanted to start. I didn't think a gluten free sourdough starter would difficult to create.
I was wrong.
I quickly learned that not all flours are created equal. Some flours would work really well, and then mold overnight for no reason at all. Some flours would work well, but they would just stall after about a month. It was a bit heartbreaking to watch starter after starter die.
I was ready to give up completely when my brown rice starter began to show great promise. Finally, six months of trying to get a starter going, and one decided to work!

Since then my starter (named Fro-dough) has stayed happy and active for three years! We have baked LOTS of bad bread together, but that's ok! Bad bread has to happen before you can get to the good bread.
If you want to get started on your own gluten free sourdough journey I'm here to help! I have dehydrated Fro-dough, and now you can start your journey immediately with a strong three year old starter culture. Grab your starter culture here.
I recommend feeding my starter with brown rice flour. I have heard from multiple customers that they've had a hard time sourcing brown rice four, so I have offered it in the shop for you as well. This way you don't have to worry about if you can find the flour, and you'll be ready to go as soon as it arrives in the mail!
The Death of A Hive
What caused this hive to die? Lets do an necropsy and find out!

Beekeeping doesn’t come easy. It seems like it should be easier than it is, but it’s not. Unfortunately for most new beekeepers, you end up with hive losses. In order to prevent losses you should begin learning immediately. I have a few resources that I really like.
Beekeeping for Dummies is an excellent book to start with. It's a great book to reference back to if you have questions. Normally I would suggest getting books like this from the library, but this is one that I would definitely keep on your personal book shelf for reference.
Beekeeping With Confidence is a well made beginner beekeeping class created by Christine from Rushing Rivers Apiaries in Northern BC. She also has a Hive membership on Instagram that has been super informative.
If you are in Ohio I recommend buying bees and equipment from Nature's Image Farm. Everyone that buys bees from him automatically gets to do his free learning yard. He sets up a bee yard when you pick up your bees. Every other week through out the season you meet up and go into the hives. So you get to see variations of what is happening in your own hives at home. It's a great place to learn, and he is fantastic about getting the kids involved in the beekeeping as well.
You should also find a local beekeeping association near you and get involved.
Now lets get down to the autopsy!
At the start of the season last year we began with two hives. Then one of our hives needed to be split because our queen kept wanting to swarm. So we moved her into her own hive to make her think that she swarmed. She never built up the hive as well as we expected, so we prepared ourselves for her hive to not make it through the Winter. Imagine our surprise when her hive is the ONLY hive still standing!
Today it is a 70 degree day, but it will drop to the 20’s for a week or so. I wanted to peak inside the hive to make sure the hive had enough resources to make it through. They are just starting to eat some fondant that I put on the hives, and the bees are foraging pollen from somewhere. Her numbers seem to be increasing, so she seems to be in a good place leading into the next few weeks.

After I checked on my living hive I decided it was time to autopsy my dead out. I never found the queen, but it was easily able to determine that mites were the ultimate cause of death. Here are the photos that made me sure that it was a mite death.

In this photo you can see a bit of leftover drone brood. There are some pin prick holes in the cappings. This is something that mites will do to get into the cell. You can also see white stuff stuck to the side of the comb. This is mite excrement.

Mites are something that all beekeepers have to deal with. You need to have a good plan in place at the beginning of the season in order for the bees to stand a chance. This hive was treated multiple times throughout the season with oxalic acid, and a few times in the Winter months. I also treated it in the Fall with Formic Pro because it had a high mite count even after my other treatments. It still wasn't enough to prevent this hive death.

Despite the fact that I have lost two hives, I'm still extremely grateful for the season. I have learned so much! Each year I will be able to gain more confidence and knowledge.
Don't let the fact that hives die scare you from trying. The beekeeping community overall is marvelous and is willing to help anyone learn how to become a beekeeper. If you decide to jump in and get some bees let me know so I can be a cheerleader for you!